 Email Updates

|
I've been planning and working on Bamm-Bamm's (my 3 year old's) vintage car bedroom and finished the first transformation into making this space "big boy" (all grease and metal!)
And I have The Iron Crafter Competition @ Fireflies and Jellybeans to thank for the inspiration!

The Secret Ingredient: Recycled Cans or Tins
 I love it, and I love the Can Pendant Lights I built for Bamm-Bamm's room!


Drill a larger hole (3/8" bit) through the center bottom of each can for the short lamp nipples. For each can, you will screw the base of the light socket to the nipple on the inside and a 1/8IP hex nut to the outside - this will keep the socket in place.
Drill 3 small holes (1/4") in the "canopy" and a larger (3/8") one in the middle. Thread the ends of each electrical wire through the pieces of aluminum tubing, leave the desired length of wire between the tubing and the can (depending on how low you want the pendant lights to hang).
Push each of the tubing pieces into each of the 3 smaller holes, and use the pliers to clamp it firmly to keep the wire in place and the tube from pulling out of the canopy (the clamped tube should hold the weight of the can light). A professional item can be ordered for the same purpose, it is called a strain relief bushing (mine didn't arrive in time :( so I had to get creative - this idea is way cheaper too).
Attach the longer nipple to the light outlet (screw in a bracket if necessary). Wire (twist) together the wires from the outlet with your new electrical wires, hot with hot and neutral with neutral, and cap them.
Slide the canopy aka hubcap over the light outlet, putting the nipple through the center hole and cap it. The length of the nipple you choose will of course depend on the canopy you use.

Voilà ! Isn't that a fun lamp for a (tough) boy's room!

I realize this is one hefty tutorial... if you want more information please email me or leave a comment!
I'm linking this post up with

And I have The Iron Crafter Competition @ Fireflies and Jellybeans to thank for the inspiration!

The Secret Ingredient: Recycled Cans or Tins

Tutorial


Build the lamp
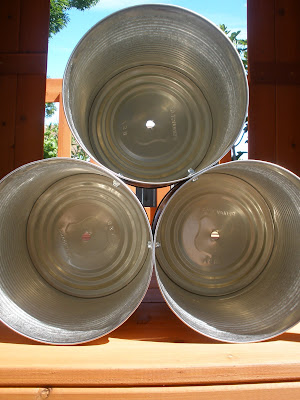
Clean the emptied cans, removing paper and glue. Drill holes (3/16" bit) in each can in order to attach them together. This will mean 2 holes in each can at the same height and so that the can seams are hidden (see picture). Use the small bolts, washers and nuts to attach the cans together.
Drill a larger hole (3/8" bit) through the center bottom of each can for the short lamp nipples. For each can, you will screw the base of the light socket to the nipple on the inside and a 1/8IP hex nut to the outside - this will keep the socket in place.
Wire the lamp
Thread each of the three electrical wires through each nipple and attach to the screws on the socket. For more information, read my post on electrical wiring.Build the pendant canopy
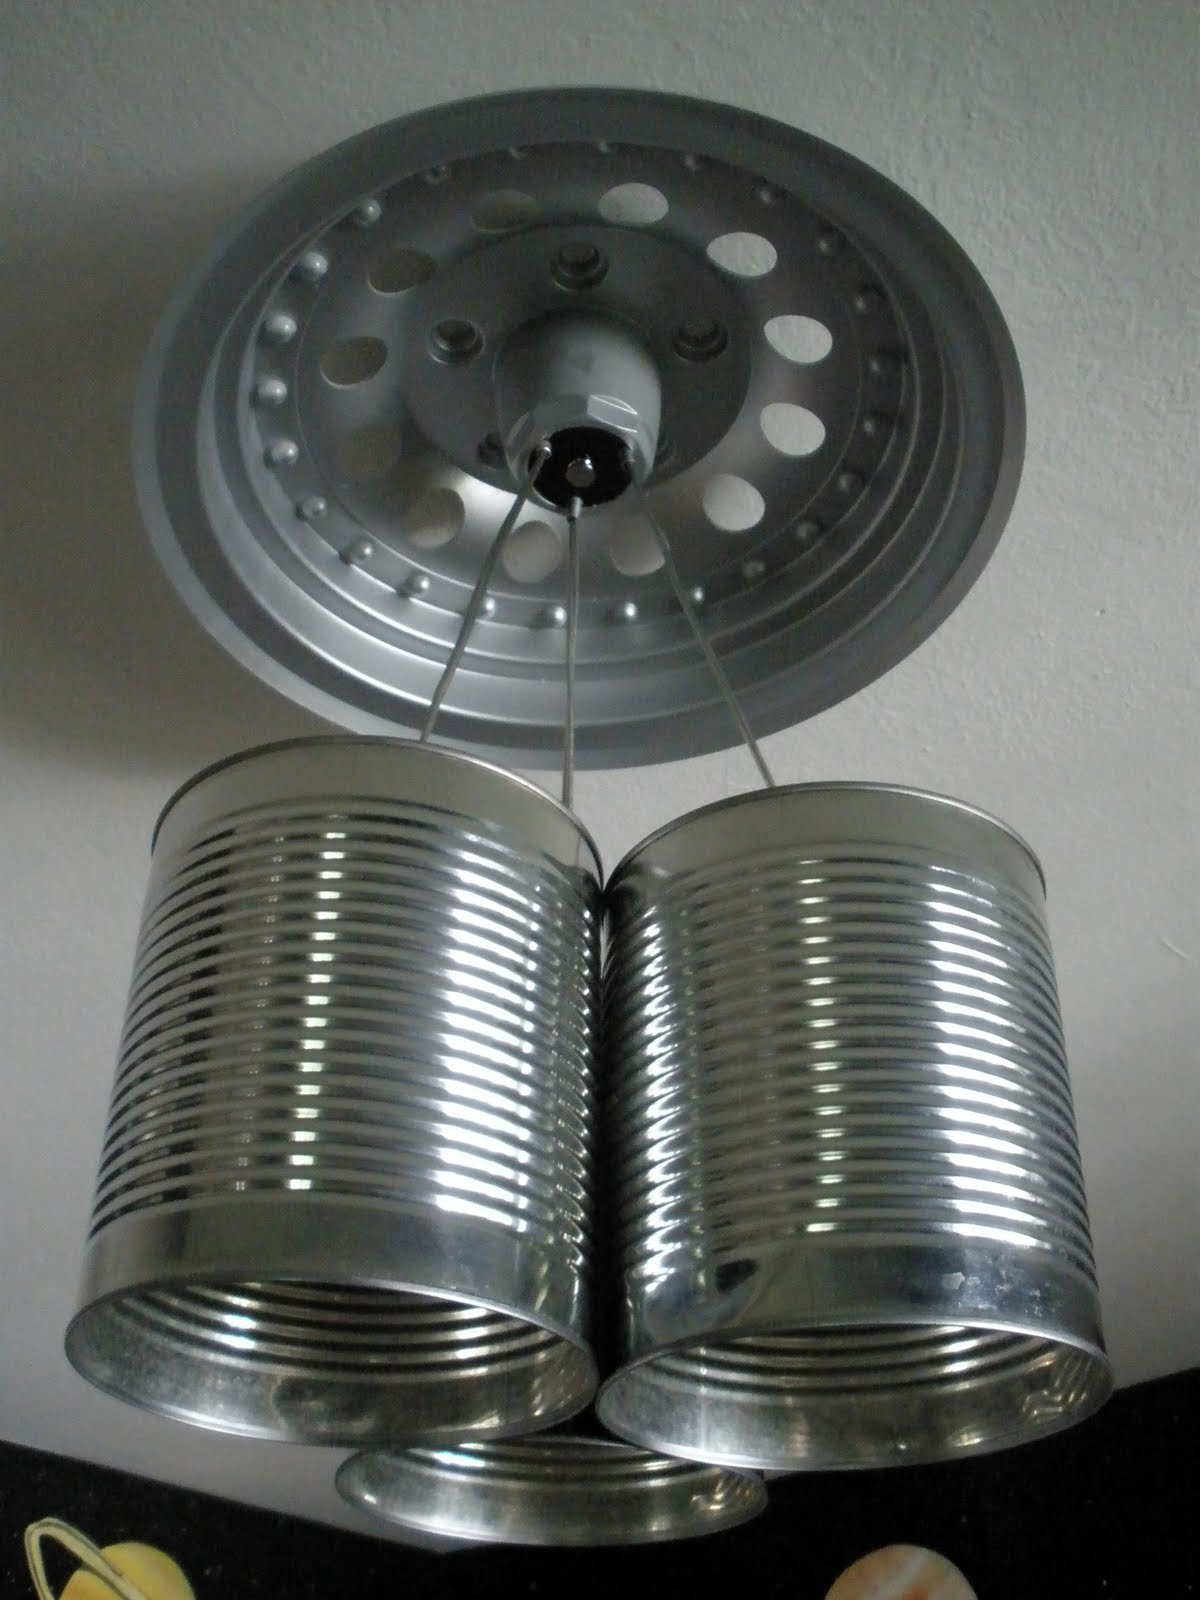
I wanted to add a touch of vintage car to the canopy, so I used a hubcap I found at the thrift store. Isn't that a great idea! Now I can think of a dozen fun things that would make interesting and different canopies for a pendant lamp - can you think of any?Drill 3 small holes (1/4") in the "canopy" and a larger (3/8") one in the middle. Thread the ends of each electrical wire through the pieces of aluminum tubing, leave the desired length of wire between the tubing and the can (depending on how low you want the pendant lights to hang).
Push each of the tubing pieces into each of the 3 smaller holes, and use the pliers to clamp it firmly to keep the wire in place and the tube from pulling out of the canopy (the clamped tube should hold the weight of the can light). A professional item can be ordered for the same purpose, it is called a strain relief bushing (mine didn't arrive in time :( so I had to get creative - this idea is way cheaper too).
Wire the light outlet
Always turn the power off at the breaker first!Attach the longer nipple to the light outlet (screw in a bracket if necessary). Wire (twist) together the wires from the outlet with your new electrical wires, hot with hot and neutral with neutral, and cap them.
Slide the canopy aka hubcap over the light outlet, putting the nipple through the center hole and cap it. The length of the nipple you choose will of course depend on the canopy you use.
Voilà ! Isn't that a fun lamp for a (tough) boy's room!

I realize this is one hefty tutorial... if you want more information please email me or leave a comment!
I'm linking this post up with
 |  |  |  |  |  |
 |  |  |  |  |  |
 |  |  |  |  |  |


Glide the cover aka hubcap over the light store, placing the nipple area through the middle opening and cap it. The duration of the nipple area you select will of course rely on the cover you use.
rs gold
WOW Gold Kaufen
D3 Gold
I think these will be more stylish if you will paint them and add so holes on the side of the cans :)
pendant lights supplier in singapore
Hi Dear,
i Like Your Blog Very Much..I see Daily Your Blog ,is A Very Useful For me.
pendant lamp WoodLED SQUARE 600 wooden luminaire made of American walnuts used as the main lighting in the bedroom of a family house. The Trilum wooden luminaire match ideally with natural and simple interior of the family home. The frame of the luminaire was chosen according to the dark wood used in the interior.
Visit Now - https://trilum.eu/en
Hi Dear,
i Like Your Blog Very Much..I see Daily Your Blog ,is A Very Useful For me.
Shop online for wide Range of interior lamps, wooden luminaire wooden lamp, handmade, led Lights &lamps on Trilum. Check new lamp and lights Collections @Trilum.eu
Visit Now - https://trilum.eu/en/
Discover our huge amount of modern ceiling lights at affordable price. We offer a variety of styles decorative light including Chandeliers, crystal chandelier, wall sconce, Pendant lighting, flush mount lighting and many more..
Nice Blog, I go through your blog and i got lots of interesting things,which could be beneficial for me in future.thanks for sharing such a nice blog. For Chandeliers, Lighting, lighting fixtures, crystal chandelier, wall sconce, Pendant lighting, flush mount lighting, lights, luxury chandeliers, ceiling lights you can visit our site.